
Generally, the bounding box option is tedious and the most restrictive. The user must manually enter four bounding coordinates.
The ad hoc or existing boundaries are more versatile and user-friendly.
After completing this lesson, you’ll be able to:
In this lesson, you will:
After completing this lesson, you’ll be able to:
In this lesson, you will:
Some self-serve spatial workflows benefit from allowing users to choose the geographic area of interest for data download. There are three ways of doing so with FME:
Generally, the bounding box option is tedious and the most restrictive. The user must manually enter four bounding coordinates.
The ad hoc or existing boundaries are more versatile and user-friendly.
You create the ad hoc boundary option using a spatial geometry user parameter, which you link to create a feature in the workspace. This parameter lets you draw a point or an area of interest to input into a workspace on FME Flow.
When configuring a workspace to run on FME Flow containing a geometry user parameter, you, or your end users, access a web map from the Run Workspace page to create the geometry feature - a point, line, polygon, or rectangle. When you draw a polygon, close the shape by clicking the starting point.
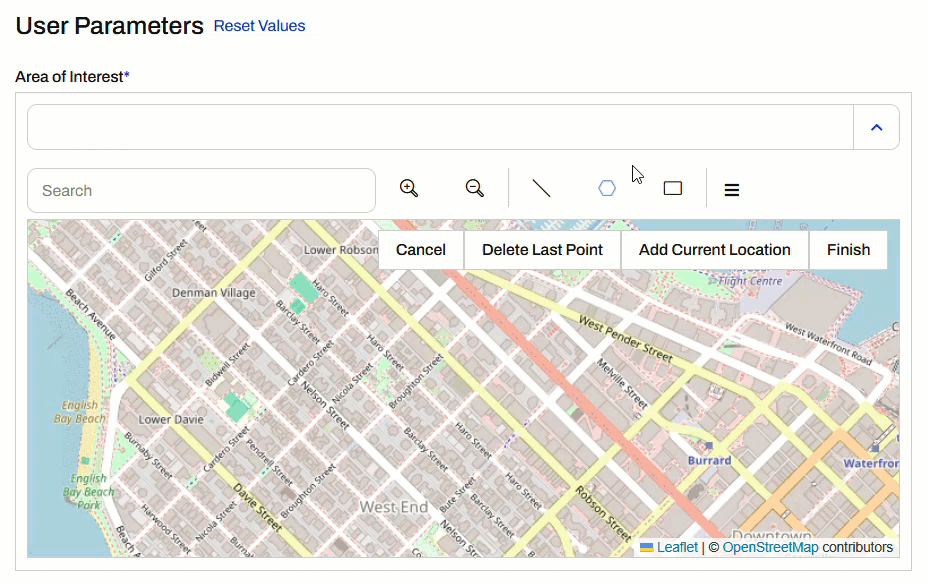
You can access the web map inline under User Parameters...
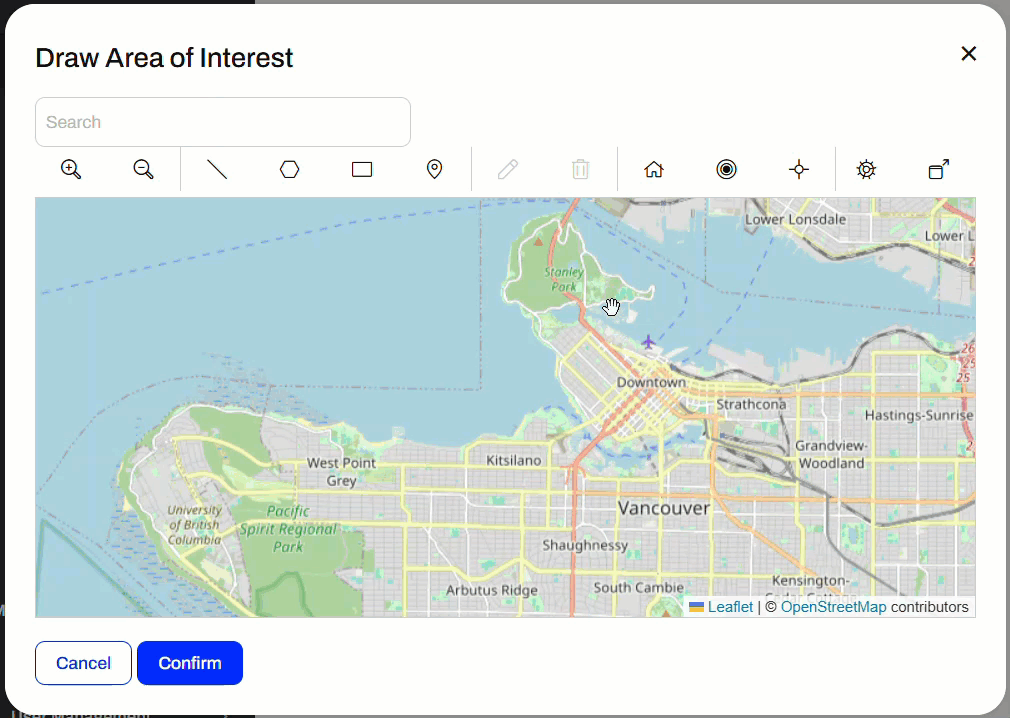
... or as a pop-up web map.
You may collapse the pop-up map by clicking  and expand the menu in the inline map
 for the option to pop it out into its own window.
For more information on the geometry parameter and setting custom basemaps for the web map in FME Flow, please see Using the Geometry Parameter.
Exercise

Jennifer continues to update workspaces to use user parameters, giving end users greater control over how the workspace operates. This time, she is responsible for managing a workflow to mail construction alerts to residents who may be affected by noise from City construction work. Normally, someone would manually generate the list of affected residents. However, Jennifer wants to let the construction teams create the list to save valuable time.
So far, Jennifer has a workspace that generates the list of affected residents and allows users to choose the format for their data download. Now, she needs to add a user parameter that allows users to select and enter their area of interest interactively.
For this exercise, follow the steps below to help Jennifer configure a geometry user parameter to take spatial input.
Open the starting workspace (C:\FMEData\Workspaces\DeployWorkflowsWithFMEFlow\get-geometry-input-from-users.fmw) in FME Workbench.
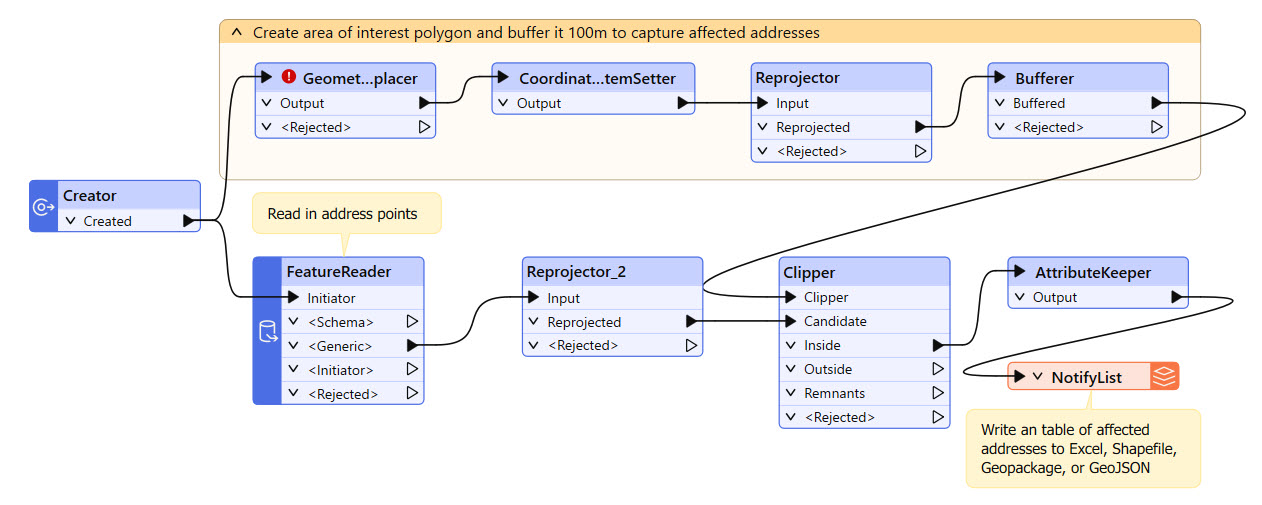
The workspace reads in Addresses, clips them to a buffered geometry input, and writes the clipped Address data in the user's choice format. The GeometryReplacer transformer is incomplete; it's missing input geometry, which you will remedy once you create the geometry user parameter.
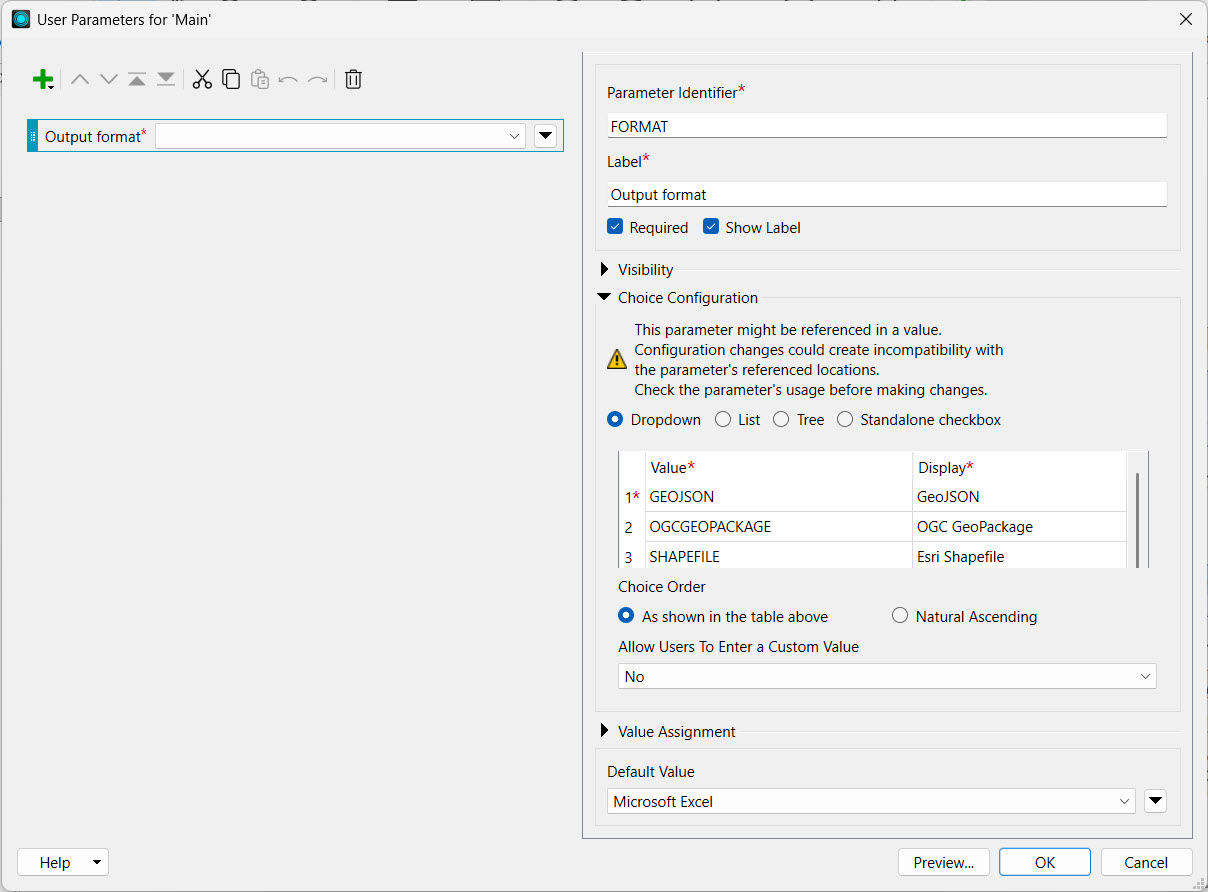
The workspace already has a user parameter that lets users choose the output format of the clipped Addresses. Right-click User Parameters in the Navigator and select Manage User Parameters...
The Output Format parameter limits the format options to specific formats. It appears to the user as a drop-down selection, with the default format set to Microsoft Excel.
Next, add a spatial user parameter to take a construction area as input from the user. Click the green + icon in the top-left. Select Spatial > Define Geometry.
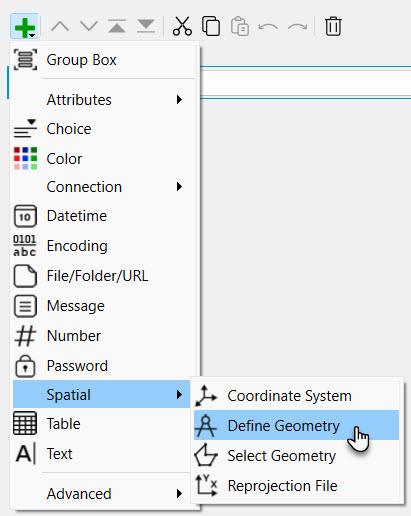
Configure it with the following options:
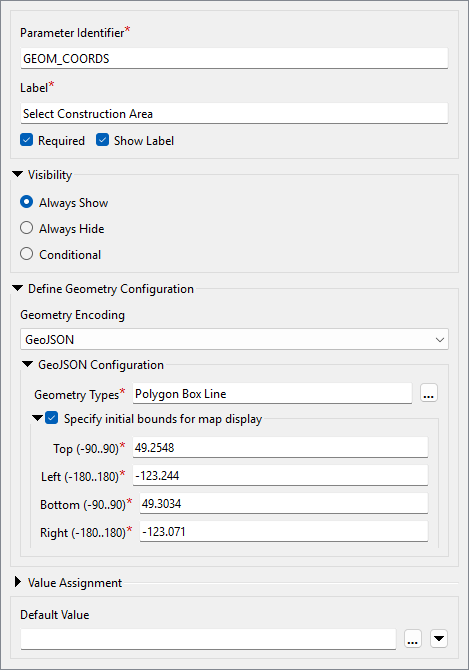
| Parameter Identifier | GEOM_COORDS |
| Label | Select Construction Area |
| Required | Checked |
| Show Label | Checked |
| Visibility | Always Show |
For Geometry Configuration, set the following and leave anything else as default:
| Geometry Encoding | GeoJSON |
| Geometry Types | Polygon, Box, Line |
| Specify initial bounds for map display | Checked |
| Top (-90..90) | 49.2548 |
| Left (-180..180) | -123.244 |
| Bottom (-90..90) | 49.3034 |
| Right (-180..180) | -123.071 |
The initial bounds will be the area shown in FME Flow when the user opens the geometry parameter map. Larger bounds will have the map zoomed out, and smaller bounds will have the map zoomed in. Your geometry parameter configuration should look like this:
Reorder the parameters so the new geometry parameter appears at the top of the list, then click OK to close the Parameter Manager.
Now that you've set up the geometry user parameter, you need to link it within the workflow.
Open the GeometryReplacer parameters. Ensure the Geometry Encoding is GeoJSON and then set the Geometry Source to the GEOM_COORDS parameter.
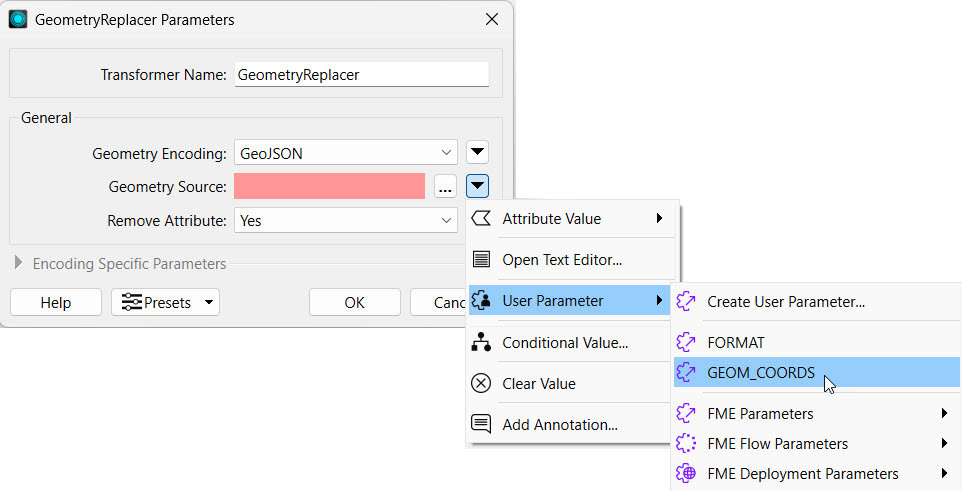
The GeometryReplacer uses the user parameter input to ensure the user's desired geometry clips the Addresses. Click OK to close the GeometryReplacer Parameters.
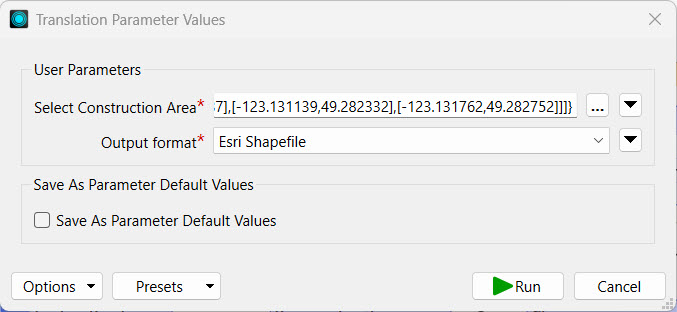
Now test the workspace results before deploying it on FME Flow. Click Run to run the workspace. In the translation parameters prompt, select Esri Shapefile as the output format.
For the Geometry parameter, you must supply GeoJSON to run and test on FME Workbench. FME Flow offers the advantage of an interactive web map. For now, paste the following GeoJSON code to test the parameter:
{"type":"Polygon","coordinates":[[[-123.131762,49.282752],[-123.132148,49.282465],[-123.131579,49.282087],[-123.131139,49.282332],[-123.131762,49.282752]]]}
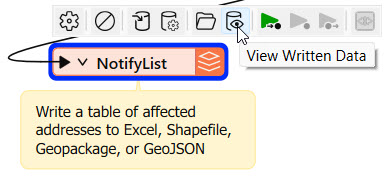
Click Run and wait for the translation to finish. Then click the NotifyList writer feature type and click View Written Data.
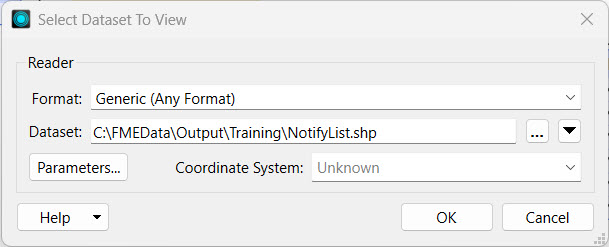
Add NotifyList.shp to the end of the Dataset parameter path and click OK.
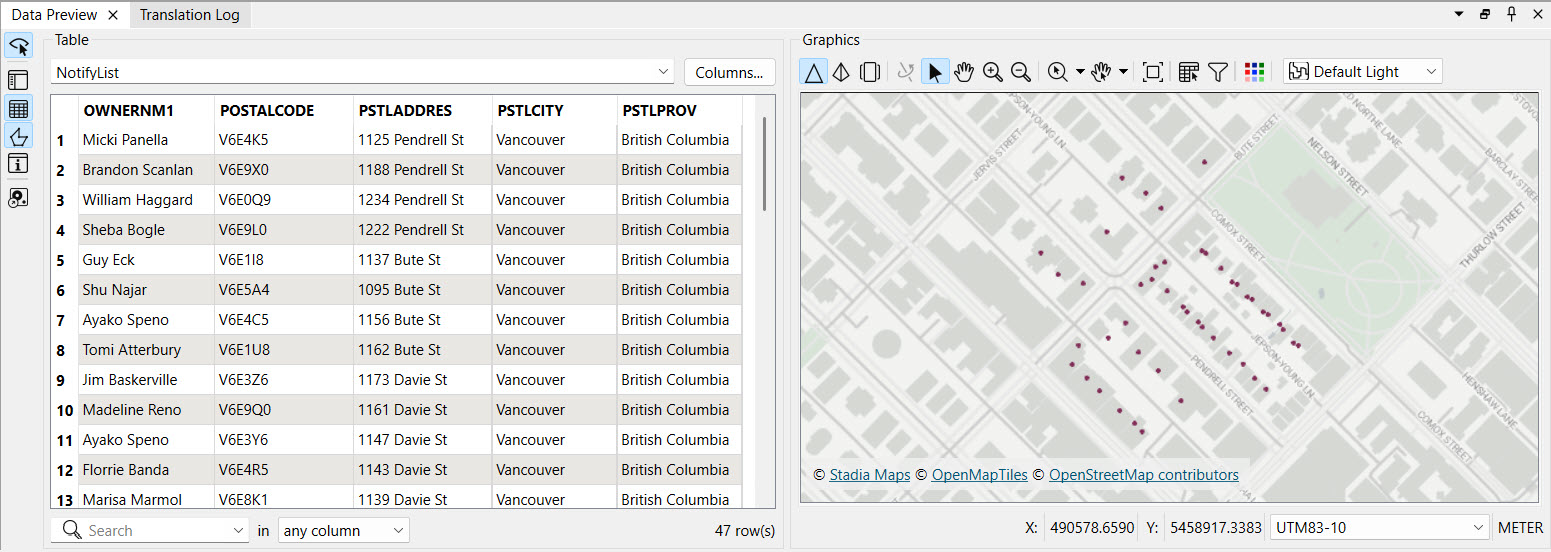
The addresses to notify, those within 100m of the area of interest you input, appear in the Data Preview window.
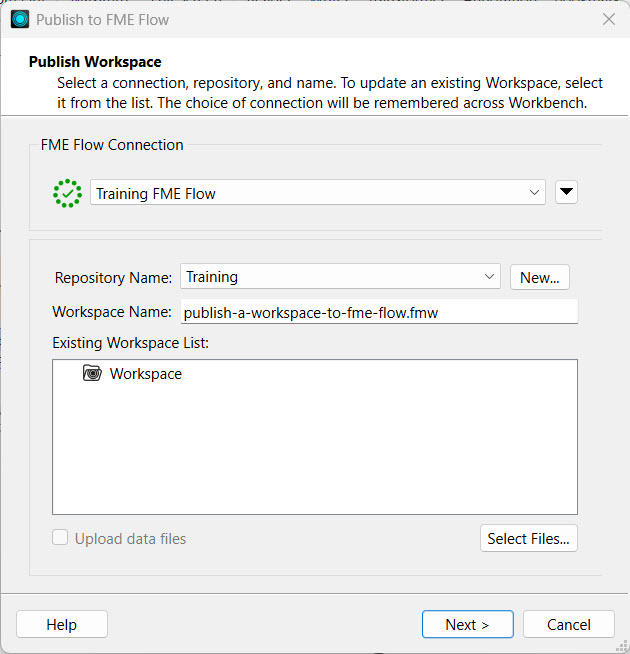
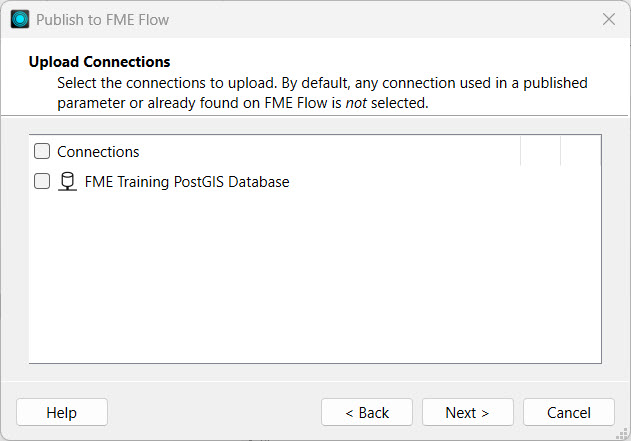
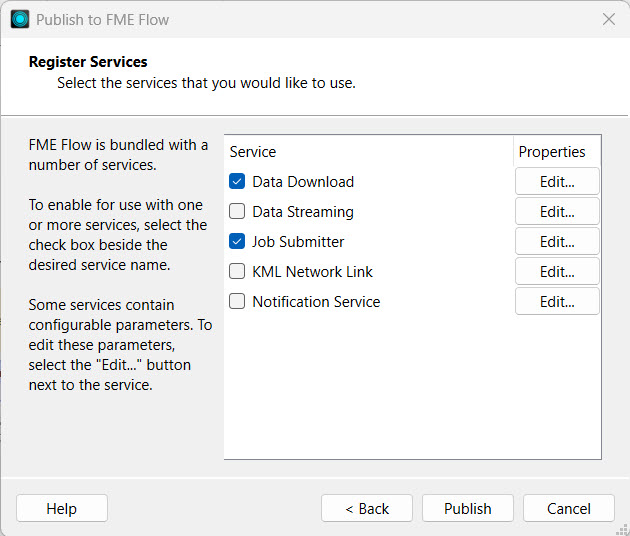
With the workspace complete, publish the workspace to FME Flow. Select the Training repository and set Data Download and Job Submitter as the services.

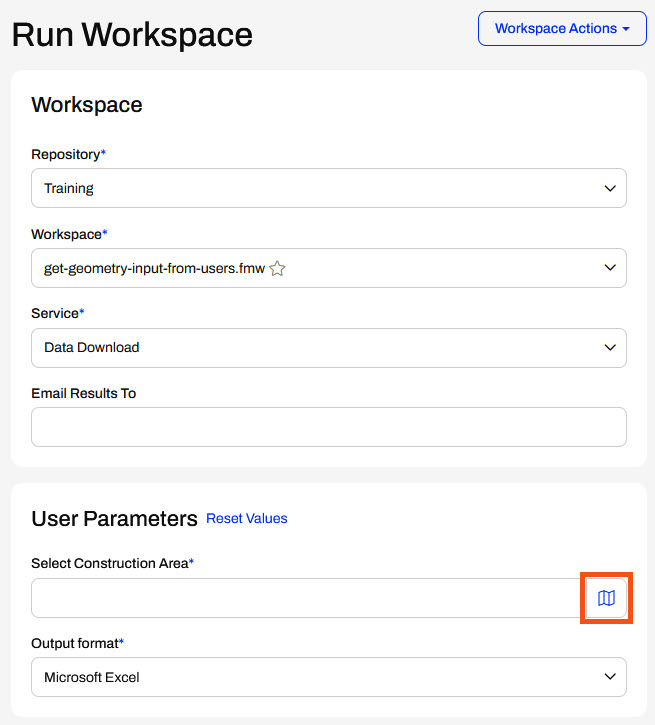
Open the Run Workspace page on FME Flow and select the workspace you just published. Set the service to Data Download. The result will contain the list of addresses to notify about construction in the format of your choice.
Under User Parameters, click the map icon for the Select Construction Area parameter.
The geometry parameter web map appears. It shows the area specified in the user parameter settings in FME Workbench and offers options along the top to select which geometry type you wish to input.
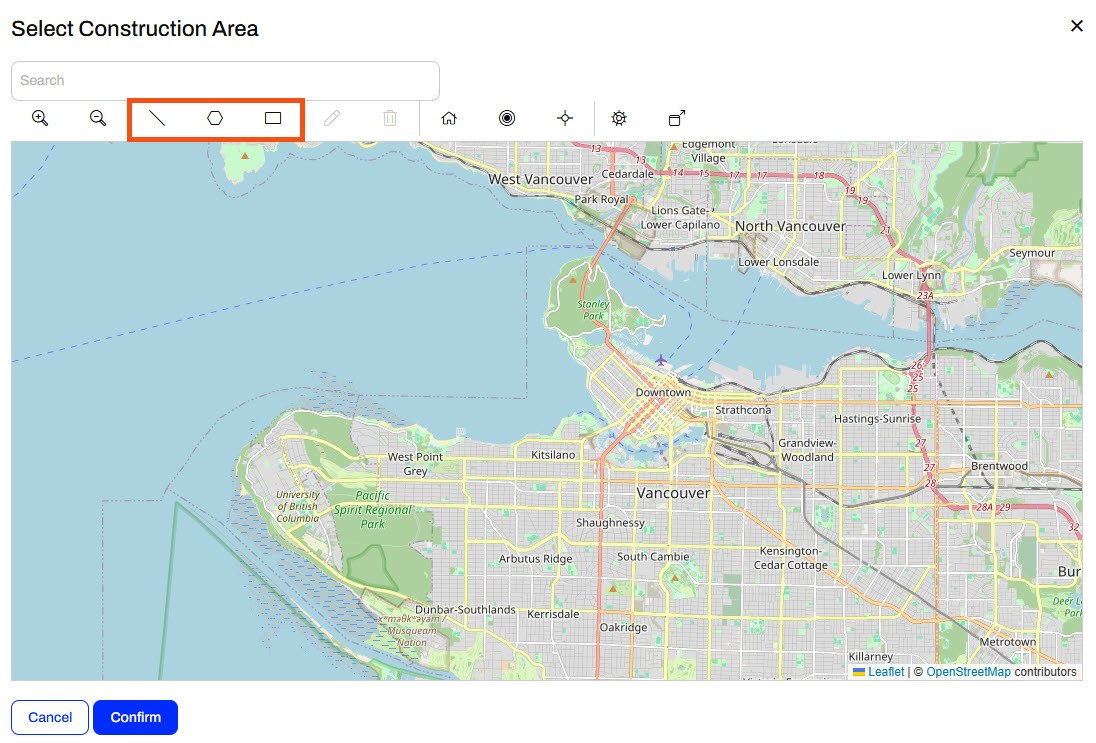
Zoom into an area like downtown Vancouver, use the polygon tool to pick an area, and click Confirm to close the map.

Confirm that GeoJSON coordinates are now present in the Select Construction Area parameter, and leave Microsoft Excel as the default output format.

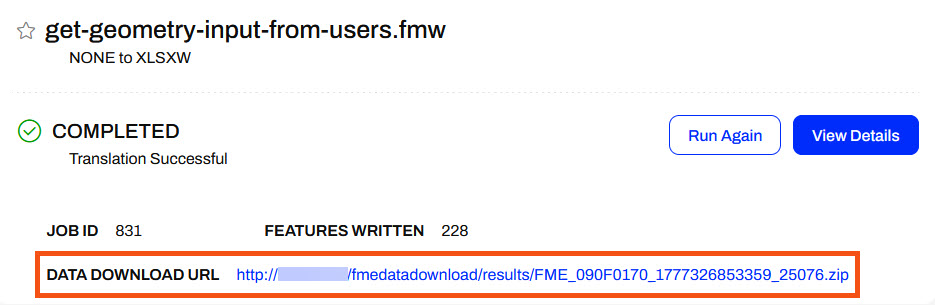
Click Run to run the workspace and wait for the Data Download URL.
Once the workspace finishes running, click on the Data Download URL to download the data.
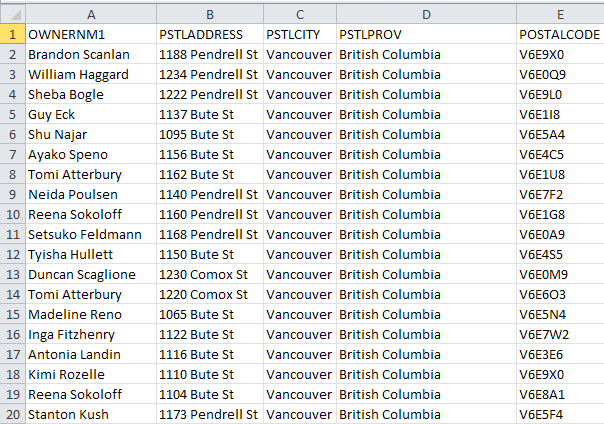
Optionally, extract and open the data in FME Data Inspector. Now, Jennifer and her colleagues can use this workspace to generate a list of residents affected by the construction and send letters to them.
Some self-serve spatial workflows benefit from allowing users to choose the geographic area of interest for data download. There are three ways of doing so with FME:
Generally, the bounding box option is tedious and the most restrictive. The user must manually enter four bounding coordinates.
The ad hoc or existing boundaries are more versatile and user-friendly.
You create the ad hoc boundary option using a spatial geometry user parameter, which you link to create a feature in the workspace. This parameter lets you draw a point or an area of interest to input into a workspace on FME Flow.
When configuring a workspace to run on FME Flow containing a geometry user parameter, you, or your end users, access a web map from the Run Workspace page to create the geometry feature - a point, line, polygon, or rectangle. When you draw a polygon, close the shape by clicking the starting point.
You can access the web map inline under User Parameters...
... or as a pop-up web map.
You may collapse the pop-up map by clicking and expand the menu in the inline mapfor the option to pop it out into its own window.
For more information on the geometry parameter and setting custom basemaps for the web map in FME Flow, please see Using the Geometry Parameter.
Exercise
Jennifer continues to update workspaces to use user parameters, giving end users greater control over how the workspace operates. This time, she is responsible for managing a workflow to mail construction alerts to residents who may be affected by noise from City construction work. Normally, someone would manually generate the list of affected residents. However, Jennifer wants to let the construction teams create the list to save valuable time.
So far, Jennifer has a workspace that generates the list of affected residents and allows users to choose the format for their data download. Now, she needs to add a user parameter that allows users to select and enter their area of interest interactively.
For this exercise, follow the steps below to help Jennifer configure a geometry user parameter to take spatial input.
Open the starting workspace (C:\FMEData\Workspaces\DeployWorkflowsWithFMEFlow\get-geometry-input-from-users.fmw) in FME Workbench.
The workspace reads in Addresses, clips them to a buffered geometry input, and writes the clipped Address data in the user's choice format. The GeometryReplacer transformer is incomplete; it's missing input geometry, which you will remedy once you create the geometry user parameter.
The workspace already has a user parameter that lets users choose the output format of the clipped Addresses. Right-click User Parameters in the Navigator and select Manage User Parameters...
The Output Format parameter limits the format options to specific formats. It appears to the user as a drop-down selection, with the default format set to Microsoft Excel.
Next, add a spatial user parameter to take a construction area as input from the user. Click the green + icon in the top-left. Select Spatial > Define Geometry.
Configure it with the following options:
| Parameter Identifier | GEOM_COORDS |
| Label | Select Construction Area |
| Required | Checked |
| Show Label | Checked |
| Visibility | Always Show |
For Geometry Configuration, set the following and leave anything else as default:
| Geometry Encoding | GeoJSON |
| Geometry Types | Polygon, Box, Line |
| Specify initial bounds for map display | Checked |
| Top (-90..90) | 49.2548 |
| Left (-180..180) | -123.244 |
| Bottom (-90..90) | 49.3034 |
| Right (-180..180) | -123.071 |
The initial bounds will be the area shown in FME Flow when the user opens the geometry parameter map. Larger bounds will have the map zoomed out, and smaller bounds will have the map zoomed in. Your geometry parameter configuration should look like this:
Reorder the parameters so the new geometry parameter appears at the top of the list, then click OK to close the Parameter Manager.
Now that you've set up the geometry user parameter, you need to link it within the workflow.
Open the GeometryReplacer parameters. Ensure the Geometry Encoding is GeoJSON and then set the Geometry Source to the GEOM_COORDS parameter.
The GeometryReplacer uses the user parameter input to ensure the user's desired geometry clips the Addresses. Click OK to close the GeometryReplacer Parameters.
Now test the workspace results before deploying it on FME Flow. Click Run to run the workspace. In the translation parameters prompt, select Esri Shapefile as the output format.
For the Geometry parameter, you must supply GeoJSON to run and test on FME Workbench. FME Flow offers the advantage of an interactive web map. For now, paste the following GeoJSON code to test the parameter:
{"type":"Polygon","coordinates":[[[-123.131762,49.282752],[-123.132148,49.282465],[-123.131579,49.282087],[-123.131139,49.282332],[-123.131762,49.282752]]]}
Click Run and wait for the translation to finish. Then click the NotifyList writer feature type and click View Written Data.
Add NotifyList.shp to the end of the Dataset parameter path and click OK.
The addresses to notify, those within 100m of the area of interest you input, appear in the Data Preview window.
With the workspace complete, publish the workspace to FME Flow. Select the Training repository and set Data Download and Job Submitter as the services.
Open the Run Workspace page on FME Flow and select the workspace you just published. Set the service to Data Download. The result will contain the list of addresses to notify about construction in the format of your choice.
Under User Parameters, click the map icon for the Select Construction Area parameter.
The geometry parameter web map appears. It shows the area specified in the user parameter settings in FME Workbench and offers options along the top to select which geometry type you wish to input.
Zoom into an area like downtown Vancouver, use the polygon tool to pick an area, and click Confirm to close the map.
Confirm that GeoJSON coordinates are now present in the Select Construction Area parameter, and leave Microsoft Excel as the default output format.
Click Run to run the workspace and wait for the Data Download URL.
Once the workspace finishes running, click on the Data Download URL to download the data.
Optionally, extract and open the data in FME Data Inspector. Now, Jennifer and her colleagues can use this workspace to generate a list of residents affected by the construction and send letters to them.